Method
Use a spade or augur and two buckets, one bucket for topsoil the other for bottom or subsoil, to get a representative sample of both the topsoil and your subsoil layers. The topsoil sample is normally taken from the top 30 cm of soil.
The subsoil sample is taken from the profile at between 30 cm down to 60 or 100 cm down, depending on the structure of the roots of the crop you plan to plant and how deep you intend to plough the soil. If the root structure is shallow, it might be necessary to only take samples of the topsoil.
Checking the profile to a deeper level will also provide a better sense of the drainage capacity of your soil. You should require about four to six samples per hectare. First visually survey the area to be planted to see if there are any obvious variances (differences) in the soil structure. If there is a clear variance then samples must be taken of each of the different soils.
If the soil looks largely homogenous (the same), take samples from across the entire planting area. Clear the surface of the sample area of any surface rubble or debris like grass and other organic material. Use a Z, S or W pattern across the sample area. It must just cover the area and any differences that you see.
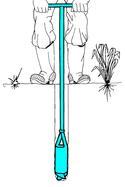
Using an Auger

If using an Auger, take the top 30 cm sample and empty it into the topsoil bucket. Repeat this process for the bottom soil from 30 cm down to the depth you have decided upon and empty this soil into the subsoil bucket.
Repeat this process for all the sample sites identified. With all the topsoil in one bucket and all the subsoil in a another.
Using a Spade

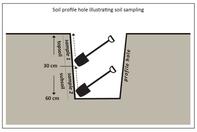
If you are using a spade or shovel to collect the samples first dig a square hole with clean smooth sides clearly showing the soil profile down to the desired depth. Take the shovel and scrape it upwards from 30 cm up to the ground level of the hole thereby scraping a two to three-centimetre layer from the sidewall so that it collects in the shovel.
This is placed in the topsoil bucket. The same process is repeated by scraping the shovel upwards from the bottom of the hole to the 30 cm mark making sure no topsoil is dislodged so that your bottom soil is not contaminated by your topsoil in the process.
This is then placed in the subsoil bucket. Repeat this process for all the sample sites identified. With all the topsoil in one bucket and all the subsoil in a another.
Once all the samples have been taken and all the sites’ topsoil samples and subsoil samples are in their respective buckets the soil in each bucket must be mixed well.
All your topsoil samples are mixed together in one bucket and all your subsoil samples are mixed together in the other. The laboratory that will be doing your analysis will have given you the sample size they require so these can be taken from the buckets and put into the sample plastic bags and marked with their detail and delivered as soon as possible to the laboratory.
By Louise Brodie